Author Archives: Fio

Finding the real IP behind Cloudflare

Cloudflare provides the services of a Content Delivery Network and at the same time enhances the security of websites. Cloudflare is easily setup for websites regardless of the platform. What Cloudflare does is it stops malicious traffic from reaching the website’s server. Any traffic requesting to access the website gets routed through Cloudflare’s network. It has its own domain name server services, so any website that uses Cloudflare will not have their real IP public.

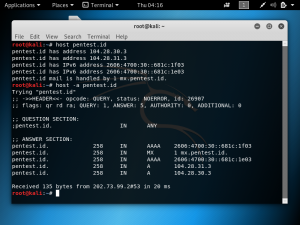
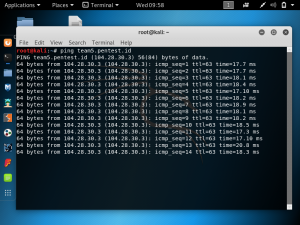
As shown below, running the command ping team5.pentest.id gives the IP address 104.28.30.3.

However, if we try to access the website through that IP address, we get the following Cloudflare error.

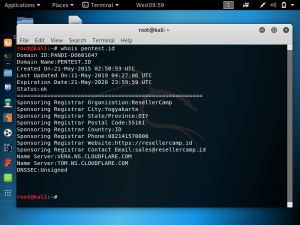
If we check the domain pentest.id using the command whois pentest.id, it shows that the name server is Cloudflare. This verifies that 104.28.30.3 is the Cloudflare IP and not the real IP.

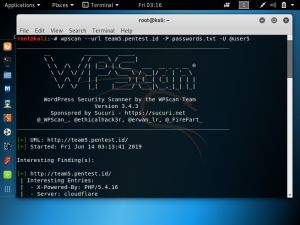
There are various methods to find the real IP of a website behind Cloudflare. The simplest one and probably the first one that should be tried is Censys.io. To use censys.io, all you need to do is input the domain that you are targeting. As shown below, censys.io gives us an IP address along with the OS, open ports, etc.

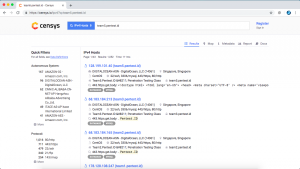
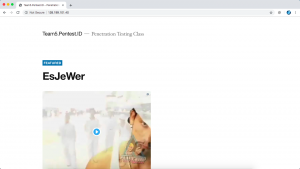
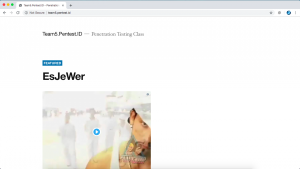
The IP address detected by censys.io is 128.199.101.40. We need to make sure that this is the correct IP of the domain. One thing you can do is try to access the website through the IP address as shown below. We see that the IP address detected by censys.io leads to team5.pentest.id.


Cloning a website with SET

Social engineering is the act of exploiting human vulnerabilities to obtain sensitive information. It relies on trust, because with a trusting relationship, the target will be more likely to share information.

Methods of social engineering include: impersonation, reciprocation, influential authority, scarcity, and social relationship.

SET is a Social Engineering Toolkit. We will be using this tool to clone a popular website, applying the method of impersonation.

To start with SET, in Kali Linux navigate to “applications” > “social engineering tools” > “social engineering toolkit”

Once SET has started, it will give you a number of options.

First, choose 1: social engineering attacks

Choose 2: website attack vectors

Choose 3: credential harvester attack method

Choose 2: site cloner

Next, input the IP address of the attacking VM. This can be found through the ifconfig command. Include also the URL of the website you are cloning. In this example, https://www.twitter.com.

If you go to the browser and type in the IP of the attacking VM, a clone of twitter.com will be displayed. If you input a username and a password into the login box, the information will be displayed in your Kali Linux command line.

This is an example of the impersonation method, because we are impersonating the login page of a well known website. The victims who visit this cloned website will assume it is the real one and would input their username and password. They will not be aware that their username and password have been sent to the attacker.

Google Hacking

Google is not just a search engine to help you find news, videos or images. Google can be a very useful hacking tool. Keep in mind, Google does not allow you to directly hack into websites, but because of its web-crawling abilities, you will be able to find any sensitive information that was not meant to be public consumption.

The act of utilising Google to find sensitive information is also called “Google Dorking” or “Google Hacking”. Google Dork uses queries to find hidden information. Running Google Dork queries will allow you to find a list of files, usernames, passwords, emails, ID’s, as well as web vulnerabilities.

The syntax format is Operator: <search string>

You can also search “index of” followed by what you are looking for. For example, index of “/ktp” will display people’s IDs.

Other Google Dork operators include:

  1. cache = this will show the cached version of any website
  2. allintext = this will search for a specific text contained in a webpage
  3. allintitle = this will search for a specific title
  4. allinurl = this will search for URLs that have specific characters contained in them
  5. filetype = this will search for file extensions

There are many more operators that can be used in a Google Dork query. To learn more, visit the Google hacking database: https://www.exploit-db.com/google-hacking-database

Custom SSL Certificate

When you are intercepting network traffic with BurpSuite, you may get an SSL error saying that your connection is not secure. Websites may not load properly and the padlock symbol next to the URL will have a warning lock. In order to prevent this, you can create a custom certificate.

In Kali Linux, open the browser, navigate to “preferences” and find “network proxy”. Click on the settings and set it to “manual proxy”.

In BurpSuite, navigate to “proxy”, then “options”. You will see that the proxy listeners is the one set previously in the browser.

To create the certificate, we will be using 3 commands in terminal as shown below:

The first command is: openssl req -x509 -days 730 -nodes -newkey rsa:2048 -outform der -keyout server.key -out ca.der

After this command, OpenSSL will ask you to enter some details for the certificate. This includes a 2-letter country code, state or province, city, organisation, unit name, common name and an email address. The example above sets the organisation name to Verisign Corp.

The second command is: openssl rsa -in server.key -inform pem -out server.key.der -outform der

The third command is: openssl pkcs8 -topk8 -in server.key.der -inform der -out server.key.pkcs8.der -outform der -nocrypt

Now when you go to “files”, you will see that three files have been created.


Return to the BurpSuite window and select “import/export CA certificate”. Then, select “certificate and private key in DER format”. The certificate file is ca.der and the private key file is server.key.pkcs8.der.

Return to the browser, open “preferences” and click on the padlock.

Scroll to the bottom of the page and click on “view certificates”.

Next you will import the ca.der file to the browser. Select “Trust this CA to identify websites”.

Verisign Corp is now included in the certificates:

The websites that you open in the browser now has an SSL certification from Verisign Corp.

Reference: https://portswigger.net/burp/documentation/desktop/tools/proxy/options

Burp Suite

In Kali Linux, you can use a tool called Burp Suite to intercept network traffic. You can find this tool under the “application” dropdown. Once you open this tool, you can select “temporary project” and “use burp defaults”. Start Burp Suite and you will see the screen shown below:

Click “proxy” and “options”. Highlight the current host and post and click “edit”. Click “request handling” and tick “support invisible proxying”. Click OK.


Open the browser (Mozilla Firefox) and go to preferences. Scroll to the bottom and click on “settings”. Select “manual proxy configuration” and put the proxy listener in the HTTP proxy. The proxy listener is 127.0.0.1 port 8080. Tick “use this proxy server for all protocol. Click OK.


In the browser, open the URL of your target. Requests are now intercepted by Burp Suite. In Burp Suite, go to “proxy”, then “intercept”. Continue to click “forward” and you will see the request as shown below:

Brute force password using WPScan

Previously we have discussed how to enumerate valid usernames and create a dictionary of common passwords. Using WPScan, we are able to perform a brute force attack to find a password that matches the username.

In the command line, type:

wpscan –url <targeturl> -P <path to password list> -U <username>.

You are able to brute force multiple usernames at once by separating them with a comma:

wpscan –url <targeturl> -P <path to password list> -U <username,username,username>.

WPScan will then try all the possible passwords in the .txt file. It will take some time depending on how many passwords are in the list and where in that list the correct password is.

Creating a password dictionary using CUPP

Before we can proceed to brute force passwords for a particular user, we need to have a list of passwords. CUPP or Common User Passwords Profiler works by asking for basic information about the target such as their first name, last name, birthday, spouse, children, pets, occupation, etc. It then uses that information to generate a list of possible passwords.

To start using CUPP, we first need to clone the repository from github. In the command line, type: git clone https://github.com/Mebus/cupp.git.

Once its cloned, cd to the directory. You can list out the folders and files in the current directory by typing “ls”. As shown below, there is the folder “cupp”, so we type: cd cupp.

To run the tool, type: python3 cupp.py -i.

CUPP will then ask you to input information about the target. As seen in the screenshot below, it will ask for first name, surname, nickname, birthdate, partner, children, pets, and company. If you are unsure you can press “enter” to skip. It is optional to add a few keywords related to the target.

Once you have included such information, CUPP will generate a password dictionary.

The screenshot below shows the password dictionary generated by CUPP.

Now that we are aware of such a tool, it is important to always think of a strong password. Try to not use common passwords that include your name or birthday, as they are easy to guess and not secure against a brute force attack.

User Enumeration using WPScan

One method of gaining access to an account is to brute force usernames and passwords. However, this attempt will not be successful if we do not have a valid username. In order to find valid usernames, we can use WPScan to enumerate users.

In the command line, type: wpscan –url <targeturl> –enumerate u.

In the above example, the target URL is team5.pentest.id.

Give it a few moments and it will list out the valid users. In this case, user5 and adminteam5.

Eavesdropping with tcpdump

Devices such as laptops, smartphones, tablets, etc. create network traffic when they are connected to the same network. When an attacker performs packet sniffing of the network traffic, they are able to view the activity on those devices such as visited websites. TCPDump is a command-line packet analyser that allows users to intercept and view packets that are being transmitted over a network.

To test these tools, prepare 2 virtual machines. One will be the attacker and the other will be the victim. If Kali Linux is already installed, you can simply clone it. For both machines, click “settings” and “network”. Here, set the network to “bridged adaptor”.

Run both machines and type the command “ifconfig” in terminal to get the IP addresses. As shown in the screenshots below, the attacker’s IP address is 192.168.1.111 and the victim’s IP address is 192.168.1.112.

In the attacker’s command line, type: tcpdump -vvn -i eth0 host 192.168.1.112 -w test.pcap. After pressing enter, try to browse various websites in the victim’s browser. As the victim browses, the attacker’s machine will eavesdrop on all the packets transmitted and received by the victim.

Footprinting

Footprinting is a technique for information gathering. In information gathering, we try to obtain as much information as possible about the target. The gathered information include:

  • Contact information
  • Configurations
  • DNS hostnames
  • IP adresses

The following are a few tools that can be used for footprinting:

1. whois

This tool can either be used as a command in terminal/commandprompt or online on whois.com. The information that can be obtained include:

  • Name servers
  • Domain status
  • Dates created and updated
  • Registrant information

The command is written as: whois <targeturl>. The screenshot below shows an example of the command: whois pentest.id. As it is shown, the website is protected by cloudflare.

2. Host

The Host command will allow us to find the hosts and IP addresses from a DNS server.

The command used is: host <targeturl>. In the example below, the command is: host pentest.id. By default, it will look up A (IPv4) record, AAAA (IPv6) record, and MX (mail) record.

3. TheHarvester

TheHarvester is a tool that can be used to obtain information such as:

  • E-mails
  • Subdomains
  • Number of hosts

The information is obtained from various public sources such as search engines and social media.

An example command is: theharvester -d microsoft.com -l 100 -b google.

The above command means that we are searching for information related to microsoft.com, limited to 100 results, and the data source is google. Aside from google we can use twitter, linkedin, facebook, bing, etc. The screenshot below shows the result: